Contributors and Guidelines
Contributors
QSDsan is developed and maintained by the Quantitative Sustainable Design Group and the broader community. Please refer to the GitHub contributors for the latest record of contributions.
Systems constructed using QSDsan are stored in the EXPOsan repository; please refer to its contributors and commit history for contribution records related to system modules.
If you would like to join the effort, please review the guidelines below. If you have any questions about the process, feel free to submit an issue on GitHub. Thank you in advance for your contribution!
Setting Up
You can set up using the command line or GitHub Desktop, a graphical alternative that is friendlier if you are new to the command line. QSDsan requires Python 3.12 or newer.
Via the command line
Fork
QSDsanby going to its GitHub homepage and clicking the “Fork” button at the top right.On your fork’s page, click the green “Code” button and copy the HTTPS address; it looks like
https://github.com/<YOUR_USERNAME>/QSDsan.git.In a terminal, navigate to where you keep your projects (for example,
cd ~/projectson macOS/Linux orcd %USERPROFILE%\projectson Windows) and clone your fork. Thegit clonecommand creates a newQSDsan/folder inside the current directory, thencd QSDsanmoves you into it:git clone --depth=1 --no-single-branch https://github.com/<YOUR_USERNAME>/QSDsan.git cd QSDsan
If you don’t have
git, see the installation instructions. The--depth=1flag makes a faster, smaller clone by fetching only recent history;--no-single-branchkeeps all branches available. If you later need full history (for example, forgit blameorgit bisect), rungit fetch --unshallow.The remaining setup steps all run from inside this
QSDsan/folder. If you close your terminal and come back later,cdback into it before continuing.Create and activate a virtual environment so
QSDsanand its dependencies stay isolated from your other projects. Pick one of the two options below; both produce a.venv/folder insideQSDsan/.QSDsanrequires Python 3.12 or newer, so make sure the interpreter you use here meets that.Option A: standard library (pip).
# from inside the QSDsan/ folder
python -m venv .venv

# then activate it:
#   Windows (PowerShell):  .venv\Scripts\Activate.ps1
#   Windows (cmd.exe):     .venv\Scripts\activate.bat
#   macOS / Linux:         source .venv/bin/activate
Option B: uv (faster, drop-in alternative).
uvmanages Python interpreters itself, so you don’t need a pre-installed Python 3.12. From inside theQSDsan/folder:# 1. have uv download Python 3.12 (skip if you already have 3.12+ on PATH) uv python install 3.12 # 2. create .venv/ pinned to that interpreter uv venv --python 3.12 # 3. activate it (same paths as Option A): # Windows (PowerShell): .venv\Scripts\Activate.ps1 # Windows (cmd.exe): .venv\Scripts\activate.bat # macOS / Linux: source .venv/bin/activate
Once activated, your shell prompt typically shows
(.venv)at the start. Every command in the rest of this guide assumes you are still insideQSDsan/with this environment activated.Install
QSDsanin editable mode with the development dependencies. This installsQSDsanfrom your local clone along with the packages needed for testing and building the documentation. Use the command matching the option you chose above:# from inside the QSDsan/ folder, with .venv activated # Option A (pip): pip install -e ".[dev]" # Option B (uv): uv pip install -e ".[dev]"
The
.in-e "."refers to the current directory (QSDsan/), which is why this step must be run from inside the cloned folder.Add the root
QSDsanrepository as theupstreamremote, then check your remotes (still from insideQSDsan/):git remote add upstream https://github.com/QSD-Group/QSDsan.git git remote -v
originshould point to your fork andupstreamtoQSD-Group/QSDsan.Pull the latest changes from upstream:
git pull upstream main
Create a branch for your work (branch names are case-sensitive):
git checkout -b <your-feature-name>
Via GitHub Desktop
If you are new to the command line, GitHub Desktop offers a graphical interface. GitHub’s guide on cloning a repository to GitHub Desktop includes screenshots.
Download and install GitHub Desktop.
Fork
QSDsanfrom its GitHub homepage.On your fork’s page, click the green “Code” button, choose “Open with GitHub Desktop”, and pick where to clone it. When prompted whether you are contributing to the parent repository or working on your own, select “To contribute to the parent repository” (see GitHub’s note on fork behavior).
You can now make commits and push to your fork. To pull in later updates from
QSDsan, use the “Current Branch” menu to merge the correspondingupstreambranch; you may occasionally need to resolve conflicts.Open a terminal in the cloned
QSDsan/folder (in GitHub Desktop: Repository → Open in Terminal) and complete steps 4–5 of the command-line instructions above to create a virtual environment and installQSDsanin editable mode.
Also contributing to EXPOsan?
Systems built with QSDsan live in the separate EXPOsan repository. If you only plan to change QSDsan itself, you can stop after the steps above. If you also plan to contribute to EXPOsan (for example, by adding a new system or modifying an existing one), use the side-by-side layout below instead so a change you make in QSDsan is immediately visible to EXPOsan.
Put both clones inside a single workspace folder, with one shared virtual environment at the workspace root:
qsdsan-dev/          workspace folder (create this; open it in your editor)
├── QSDsan/          git clone of your QSDsan fork
├── EXPOsan/         git clone of your EXPOsan fork
└── .venv/           shared virtual environment (one level above each repo)
The setup differs from the single-repo flow in two places:
Create the workspace folder first, then clone both forks into it (fork
EXPOsanthe same way you forkedQSDsan):mkdir qsdsan-dev cd qsdsan-dev git clone --depth=1 --no-single-branch https://github.com/<YOUR_USERNAME>/QSDsan.git git clone --depth=1 --no-single-branch https://github.com/<YOUR_USERNAME>/EXPOsan.git
Create the virtual environment at the workspace root (
qsdsan-dev/), not inside either repo, then install both packages in editable mode from that same folder:# still in qsdsan-dev/, with .venv created and activated as in step 4 above # Option A (pip): pip install -e "./QSDsan[dev]" pip install -e "./EXPOsan[dev]" # Option B (uv): uv pip install -e "./QSDsan[dev]" uv pip install -e "./EXPOsan[dev]"
The remaining git remote add upstream / branching steps are unchanged, but run them inside each repo separately (cd QSDsan to configure QSDsan, cd ../EXPOsan to configure EXPOsan); they have independent upstreams and independent feature branches.
Note
Keep this workspace folder out of cloud-synced locations (OneDrive, Dropbox, iCloud). A virtual environment is tens of thousands of files; syncing them is slow and can corrupt the environment’s tooling.
Tip
Keep the environment relocatable
If you create the environment with uv, add the --relocatable flag (uv venv --relocatable). A normal environment hard-codes the absolute path of its Python interpreter into every console-script launcher (pytest, sphinx-build, and so on); renaming or moving qsdsan-dev/ afterwards breaks those launchers with errors like “failed to canonicalize script path”. --relocatable makes them use relative paths, so the folder can be safely moved. If you hit this with an environment that already exists, recreate it.
Notes
Forking is the default workflow for all first-time contributors. Constant contributors who have made at least one successful and meaningful contribution through a fork may be given write access and invited to join the
QSDsanteam, after which branches can be used directly for easier syncing.As
QSDsanis public, all forks are public as well. If you would prefer a private fork, see the tip on creating a private fork.GitHub has detailed documentation on forking and related workflows.
Development Workflow
Develop your contribution on the branch you created, documenting and testing as you go, then push to your fork and open a pull request.
Developing modules
Add or modify modules on your feature branch. Keep commits focused and write concise commit messages; you can use multiple branches for different features. As you work, periodically merge in upstream changes and resolve any conflicts:
git pull upstream main
Documentation
Whenever new modules or functions are added, include concise, thorough docstrings with examples for doctest. Please also add yourself (contact method optional) to the list of contributors at the top of the module.
QSDsan uses the numpydoc docstring style with some modifications for better rendering:
Both single quotes (‘’) and double quotes (“”) are fine.
For notes in a docstring, use directives so they render with Sphinx:
# Rendered by Sphinx and recognized as a docstring note
.. note::

    Something to note.

# NOT rendered by Sphinx
Notes
-----

# Rendered by Sphinx but not recognized as a docstring note
Note
----
Use directives like
:class:`package.class`and:func:`class.function`for classes and functions; these add links to the corresponding documents. Use single back ticks in error messages and warnings, since directives are not rendered there.To refer to other internal modules or external packages, include them in a “See Also” section (see
qsdsan.unit_operations.AnaerobicDigestionandqsdsan.Componentfor examples).This memo on reStructuredText and Sphinx is a helpful reference.
Most documentation is generated automatically through Sphinx’s autodoc extension. If your contribution adds new classes or modules, add a new .rst file under docs/source/ and reference it from the appropriate section of index.rst (refer to existing files for examples). Tutorials are written as Jupyter notebooks; when adding or updating them, follow the structure of the existing notebooks in docs/source/tutorials.
Build the documentation locally before submitting a pull request to confirm links and formatting are correct. This YouTube walk-through demonstrates the process.
Testing
QSDsan uses GitHub Actions to test every push and pull request. A pull request is accepted only when:
Meaningful contributions have been made.
The branch has no conflicts with the root repository.
All tests pass.
Run the tests locally before submitting. From your activated environment, in the cloned QSDsan directory:
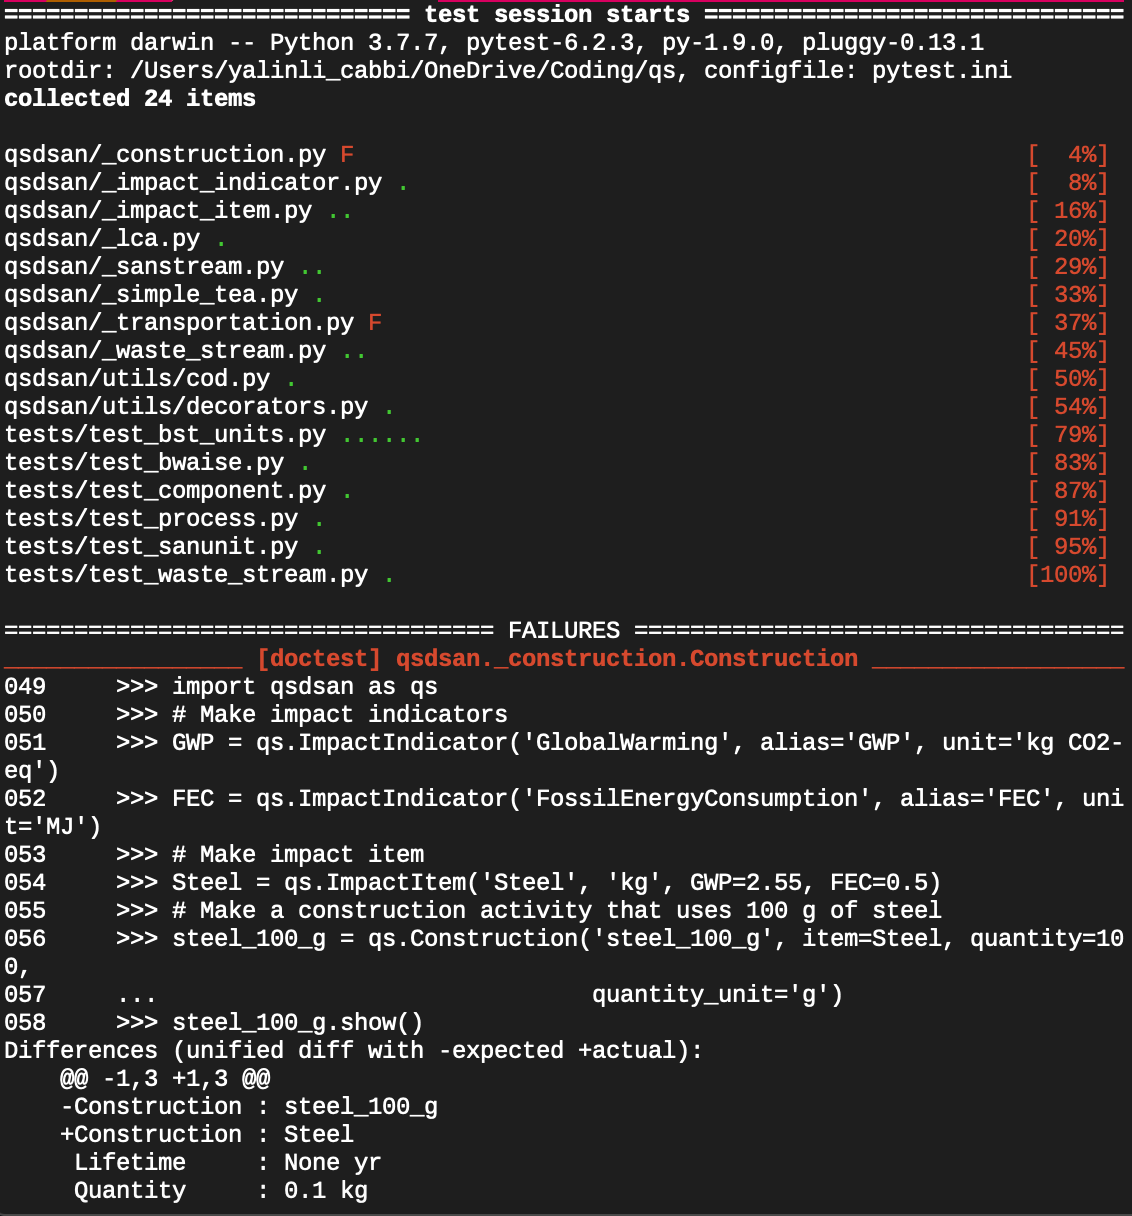
pytest # if this doesn't work, try `python -m pytest`
This runs everything under tests/ as well as the documentation examples via doctest. A dot is a passing test and an F is a failure; tracebacks for any failures are printed to help you debug.
To confirm Python is using your local clone rather than another installed copy:
python -c "import qsdsan; print(qsdsan.__path__)"
The printed path should point inside your cloned QSDsan folder.
Committing and pushing
Push your branch to your fork. Pushing your work online backs up your history and makes it easier for maintainers to help you debug:
git push origin <your-feature-name>
Submitting a Pull Request
Once you are satisfied with your changes and have pushed all commits to your fork, go to your GitHub fork of
QSDsanand submit a pull request. Before submitting, pull the latest changes from the upstream repository (git pull upstream main) and resolve any conflicts, so your branch is ahead of the upstreammainand not behind it.A member of the Quantitative Sustainable Design Group will review your changes and accept them or discuss any needed edits with you.
For Maintainers
Maintainers reviewing pull requests that touch BioSTEAM/Thermosteam imports, stream/unit APIs, unit registries, or the Stream/SanStream/WasteStream taxonomy should follow the PR audit checklist at docs/maintainer/pr_audit_checklist.md, which also explains how to install it as a Codex or Claude Code skill.