Contributors and Guidelines
Contributors
While main developers of QSDsan are listed below, we thank all contributors who have supported the development and maintenance of this platform. If you would like to join the effort, please review our guidelines and instructions below.
Lead Developers
Yalin Li (current maintainer)
Xinyi (Joy) Zhang (process models & benchmarking)
Tutorials and Videos
System Modules
Systems constructed using QSDsan are stored in the EXPOsan repository.
Contributing Guidelines
Below are some brief instructions on how to contribute to QSDsan. If you find yourself struggle with the installation of QSDsan/setting up the environment, this extended version of installation instructions might be helpful to you. If you have any questions regarding the process, feel free to submit an issue on GitHub. Thank you in advance for your contribution!
Forking and Cloning
Via command-line interface
Fork
QSDsanby going to its GitHub homepage and click the “Fork” button at the top right corner.GitHub will open a new page showing your fork, click the green “Code” button on the top and copy the HTTPS address (there’s a handy copy button next to the address), it should be something like:
https://github.com/<YOUR_USERNAME>/QSDsan.git
In your command-line interface (e.g., Anaconda prompt, terminal), navigate to your preferred location by using
cd, e.g.,cd research/coding
Clone
QSDsanto your local by (use your own link copied from step 2):git clone https://github.com/<YOUR_USERNAME>/QSDsan.git --depth=1
If you don’t have
git, follow the instructions to install it.The
--depth-1flag is to tellgitjust clone the latest commit, you can change the depth number or just remove this flag completely, but thengitwill download more historical commits, which takes longer time to clone and needs more space.
Note
This will only clone the main branch, if you want other branches, then use the
no-single-branchflag, i.e.git clone https://github.com/<YOUR_USERNAME>/QSDsan.git --depth=1 --no-single-branch
Without the
no-single-branchflag, the reference of the remote branch (when you dogit fetch) is set to the main branch only (instead of all of the existing and future new branches), i.e., when you dogit config --get remote.origin.fetch
you will see
+refs/heads/main:refs/remotes/origin/main
Because it only tracks the main branch, so if didn’t include the
no-single-branchflag when cloning but later wanted to pull/push other branches, you will need to update the fetch reference to all branches using:git config remote.origin.fetch "+refs/heads/*:refs/remotes/origin/*"
and you can double-check again to confirm the fetch reference has been updated.
Navigate into the cloned QSDsan:
cd QSDsan
Install required packages:
pip install –r requirements.txt
Add the root
QSDsanas the upstream:git remote add upstream https://github.com/QSD-Group/QSDsan.git
Check your remote settings:
git remote -v
This should show something like (origin is your fork and upstream is the root repository):
origin  https://github.com/<YOUR_USERNAME>/QSDsan.git (fetch)
origin  https://github.com/<YOUR_USERNAME>/QSDsan.git (push)
upstream        https://github.com/QSD-Group/QSDsan.git (fetch)
upstream        https://github.com/QSD-Group/QSDsan.git (push)
Pull in upstream changes:
git pull upstream main
If you are working on a new feature (rather than some quick work like fixing a small bug), then it is recommended to checkout a new branch (note that branch names are case-sensitive):
git checkout -b <REPLACE-ME-WITH-FEATURE-NAME>
Via GitHub Desktop
If you are new to command-line interface, GitHub Desktop can be a good way to get started as it has a graphic interface, though less powerful.
To see screenshots of the different interface, visit GitHub’s documentations on Cloning a repository from GitHub to GitHub Desktop
Download and install GitHub Desktop.
Fork
QSDsanby going to its GitHub homepage and click the “Fork” button at the top right corner.GitHub will open a new page showing your fork, click the green “Code” button on the top and select “Open with GitHub Desktop”.
GitHub Desktop will automatically open, and it will ask you where you want to clone it, select a place that you like.
Next, you will be prompted to select whether you want to contribute to the parent repository or for you own purpose, we would appreciate your contributing back to QSDsan, so please select “To contribute to the parent repository” :). You can read more about this, including how to change this setting, in this post about fork behavior.
In the opened dialogue, click on the “Fetch origin” button on the top, then if you click the “Current Branch” button (next to the “Fetch origin” button), you should see a list of the branches on your fork (start with “origin”, e.g., “origin/main”) and those from the root repo managed by us (start with “upstream”, e.g., “upstream/main”). All branches on your fork are copied from the corresponding branch from the root repo (i.e., “origin/main” copied from “upstream/main”) at this moment. You can choose which one you would like to work on, if unsure, just select main (i.e., “origin/main”).
You can work on your changes locally, make commits, then push to your fork remote (i.e., on GitHub’s website). Pushing them online would allow you to save/back up the history of your changes, and makes it super easy for us to help you debug.
In the future, whenever you want to merge changes from QSDsan (e.g., we just release a new feature), click on the “Current Branch” button, then click the “Choose a branch to merge into main” (“main” would be the name of the branch that you are working on) on the bottom of the drop-down, then select the branch from the root repo (starting with “upstream”, e.g., “upstream/main”) that you want to pull changes from, and click the “Create a merge commit” button on the bottom. Note that you can control whether Git does the pull (“merge”, “rebase”, etc.), check Git/GitHub’s documentation if you want to know more. Also note that sometimes you need to resolve conflicts prior to merging.
Note
We use fork as the default way for collaboration (i.e., for all first-time contributors). If you are a constant contributor and have independently made at least one successful and meaningful contribution through forking, you will be given the write access to
QSDsanand you can use branch for easier code syncing. We will also invite you to join theQSDsanteam.GitHub has really detailed documentation on forking (and almost everything else).
As QSDsan is public, all created forks would be public as well. We would appreciate if you make your work public and contribute back, but we understand it if you would like to create a private fork of QSDsan. To do so, please check our tip on creating the private fork.
As we are constantly developing
QSDsanwith its core dependenciesBioSTEAMandThermosteam, it’ll be good to clone those two repositories and use theqsdsanbranch of both.
Developing Modules
Adding/modifying modules locally.
Commit your changes and concisely summarize your changes in the commit message.
You can have multiple branches for different features.
Push your local changes to your remote fork:
git push origin main # or the name of the new branch
As your develop your contributions, the root repository may update, you should merge these changes and resolve any conflicts before your final push.
git pull upstream main
Submitting Pull Request
Once you are satisfied with your changes and push all commits to your fork, go to you GitHub fork of
QSDsan, and submit a pull request.You can confirm that you have pulled all updates from the root repository if there’s a message showing that your branch is X commits ahead of QSD-Group:main (not X commits ahead, Y commits behind).
One of the Quantitative Sustainable Design Group members will review your changes and accept or discuss with you if edits are needed.
Documentation
Whenever new modules or functions are added, concise and thorough documents should be added with examples for doctest. Please also include yourself (contact method is optional) to the list of contributors on the top of the module.
QSDsan uses numpydoc docstring style with some modifications for better rendering. Some important notes:
Both quotes (‘’) and double quotes (“”) are good.
If you want some notes in your docstring, use directives so that it can be rendered by Sphinx.
# This can be rendered by Sphinx and as docstring
.. note::

        Something to notes.

        [1] If you need to have a numbered list, be careful about line-wrapping and indentation.
        The start of the second line should align with the number, not the first character after the number.

        [2] Second point.

# This won't be rendered by Sphinx
Notes
-----

# This can be rendered by Sphinx but won't be recognized as docstring
Note
----
Use directives like
:class:`package.class`and:func:`class.function`to indicate classes and functions, this will automatically add links to the corresponding documents.Use single back ticks (``) in error messages and warnings since directives won’t be rendered.
If you want to refer to documents of other internal modules or external packages, please include it in the “See Also” section (refer to
qsdsan.sanunits.AnaerobicDigestionandqsdsan.Componentas examples).Here is a great memo on reStructuredText and Sphinx.
Most of the documentations will be automatically generated through Sphinx’s autodoc extension. If your contribution involves new classes or modules, please add a new .rst file in docs/source/. and add it to the appropriate section in the index.rst file. You can refer to any of the existing files for examples.
We recommend generating the documentation locally prior to push to GitHub/send in the pull request to make sure links, formatting, etc. are working properly. This YouTube video provides a good walk-through example/demonstration.
Tutorials are prepared in Jupyter Notebook and potential contributors are encouraged to use the templates which includes proper license and contribution information.
Testing
QSDsan uses GitHub Action to test all pushes and pull requests. A pull request will only be accepted when:
Meaningful contributions have been made.
The branch has no conflicts with the root repository.
All tests have been passed.
To run pytest, first make sure you have all the packages needed for testing. If you’ve already have QSDsan running locally, you just need pytest-cov and nbval. You’ll also need EXPOsan (the cloned repository would be better) if you do not have it.
Then you’ll need to let your CLI know where to find your clone packages. The easiest way to do it is to add a .pth file in the path of your python package libraries (e.g., the site-packages folder of your conda environment), you can usually find the path by
python # to launch Python
from distutils.sysconfig import get_python_lib
print(get_python_lib())
The name of the .pth file does not matter just make sure you’ll remember what it’s used for (e.g., cloned_pkgs.pth), and it just needs to include the path for your cloned packages, for example, a working one could be:
C:Users<YOUR_USERNAME>DocumentsCodingthermosteam
C:Users<YOUR_USERNAME>DocumentsCodingbiosteam
C:Users<YOUR_USERNAME>DocumentsCodingQSDsan
C:Users<YOUR_USERNAME>DocumentsCodingEXPOsan
Note that the <YOUR_USERNAME> is just a placeholder for the actual user name of your computer, and the format of the path would be different depending on your OS (the example is Windows, note that only one backward slash \ is needed).
If you want to verify if Python can now find the cloned packages successfully, you can try to import QSDsan in your Python shell:
python
import qsdsan
print(qsdsan.__path__)
['C:\\Users\\<YOUR_USERNAME>\\Documents\\Coding\\QSDsan\\qsdsan']
After configuring the path, in your CLI, navigate to the cloned QSDsan package directory, then you can simply run the test locally using pytest:
pytest # if this doesn't work, try `python -m pytest` or `python3 -m pytest`
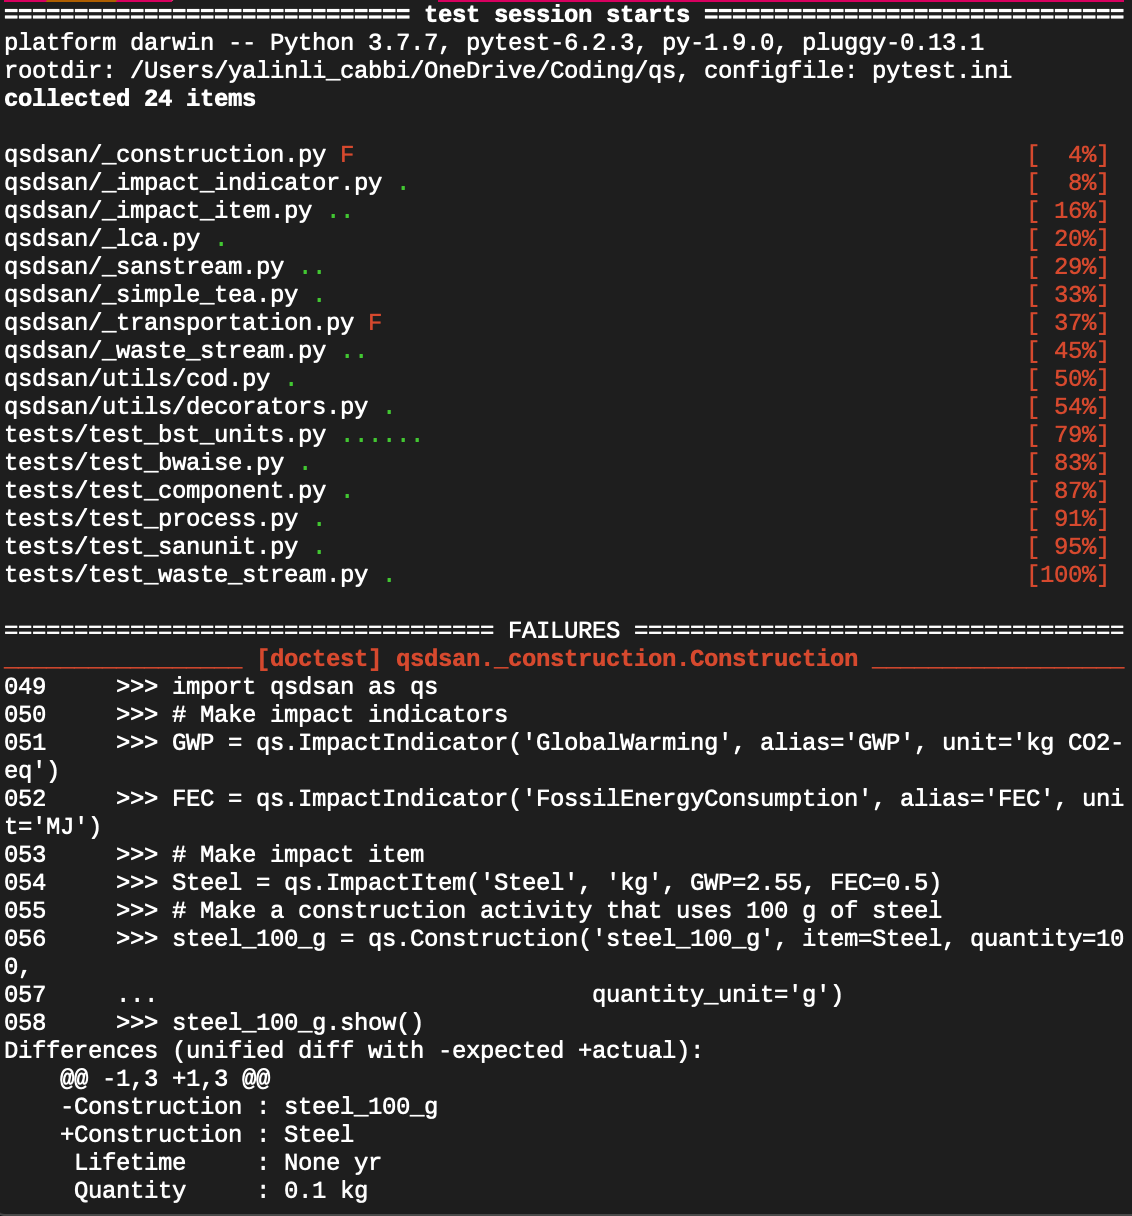
This runs all tests under the QSDsan/tests directory as well as all examples in the documentation through doctest. Test results will be similar to the screenshot below, where a green dot indicates the test has been successfully passed and a red F indicates a failure. The number of dots and Fs indicate how many test functions or doctests are run for each moduel. Detailed error traceback on each failed test will be listed to help you fix the bug.